How to Make a Fire Pit in Your Backyard
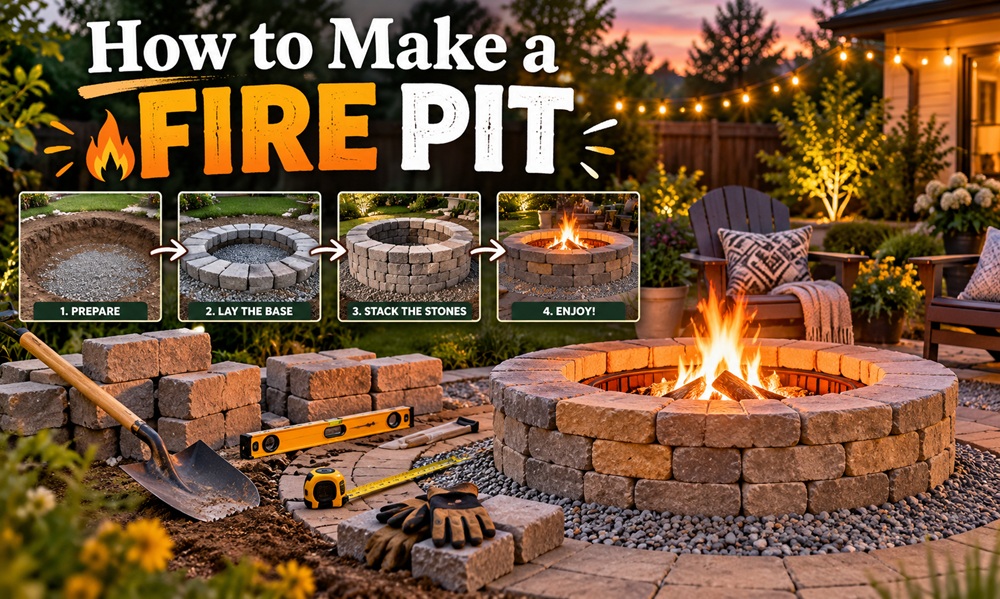
The easiest way to make a fire pit is to stack a ring of retaining wall blocks on a level, compacted gravel base, set a liner of firebrick or a steel ring inside, and glue the top course in place. A first-time builder can usually finish one over a weekend with basic tools. Most of the effort goes into preparing the site, not the building itself.
This guide covers a wood-burning block pit, the most common DIY approach, followed by a few alternatives and the safety points that matter most.
Check the Rules Before You Dig
Fire pit rules vary widely. Some cities restrict open burning, require permits, set minimum distances from structures, or ban wood fires during dry spells. Homeowners associations may add limits of their own. Check with your local fire department or municipality first, and ask your insurer if you aren’t sure whether a pit affects your coverage.
Then contact your local utility-locating service before breaking ground. In the United States, that means dialing 811. Buried lines can run through backyards at shallow depths, and hitting one is both dangerous and expensive.
Pick the Spot
Choose level ground well away from the house, fences, sheds, and overhanging branches. A common guideline is at least ten to twenty-five feet from any structure, though your local rules may be stricter. Look up as well, since low branches and power lines are a hazard. Think about wind direction too. Smoke drifting toward a neighbor’s open windows won’t win you any friends.
What You’ll Need
- Retaining wall blocks, enough for two or three courses in a circle
- Masonry construction adhesive
- Crushed gravel or paver base for the foundation
- Firebrick or a steel fire ring insert for the inner lining
- Sand, if you want to fine-tune the first course
- Shovel, rake, hand tamper, level, tape measure, stakes and string, and a rubber mallet
- Safety glasses and work gloves
Lay out a dry circle before you buy more material than you need, since the number of blocks depends on their size and the diameter you choose. Many builders aim for an interior diameter of about three to four feet so several people can sit comfortably, with walls somewhere between 12 and 18 inches high.
Choose heat-rated materials. Standard concrete and many natural stones can crack when heated unevenly, and porous or damp stones such as river rock can trap moisture that turns to steam and bursts. Use blocks designed for fire pits, or line the inside with firebrick to protect them.
Build It in Seven Steps
- Mark the circle. Drive a stake into the center of your spot, tie a string to it, and walk the string around the stake to paint or scratch the outer edge of the pit. Make the circle a few inches wider than the blocks will cover so you have room to work.
- Dig the base. Remove the sod and soil inside the circle to a depth of about six inches, keeping the bottom as flat as you can. Pull out any roots or large rocks that might shift later.
- Add and compact the gravel. Pour in roughly four inches of crushed gravel, working in thin layers and tamping each one firmly. Check with a level in several directions. A solid base keeps the whole pit from tilting as the ground freezes and thaws or gets rained on.
- Set the first course. Place the blocks around the circle with the tight side facing in, tapping them with the mallet and checking level as you go. This course matters most, because any error here carries into every layer above it. A thin layer of sand under each block can help you fine-tune the height.
- Stack the remaining courses. Offset the joints from one course to the next, the way a mason lays brick. Dry-fit each course first, then apply beads of masonry adhesive on top of the layer below before setting the next one. Cap blocks, if you’re using them, go on last.
- Install the lining. Set firebrick snugly around the inside wall, or drop in a steel ring sized to fit. The lining takes the direct heat so the outer blocks don’t have to, which extends the life of the pit considerably. Leave a little room for expansion rather than forcing pieces tight.
- Finish the bottom and let it cure. Add a couple of inches of gravel or lava rock inside so rainwater can drain through, and let the adhesive cure for as long as the product label directs before you light the first fire.
Other Ways to Build One
A Steel Ring on a Paver Pad
This is the simplest option. Level a patch of ground, lay a bed of compacted gravel and pavers, and set a purchased steel ring on top. It takes an afternoon, and you can move or remove it later.
A Dug-In Pit
A shallow pit set into the ground looks low and natural. It does bring extra concerns, though, including drainage in wet weather, heat reaching nearby roots, and local rules that don’t allow pits below grade. Check before you dig.
A Gas-Fueled Pit
Gas builds add fuel lines, burners, and ventilation requirements. In many areas, connecting to natural gas or a permanent propane line should be handled by a licensed professional, and the enclosure needs proper airflow. This is a better project to plan with a pro than to improvise.
Mistakes That Cause Trouble
Skipping the gravel base is the most common error, and it shows up as a tilted, cracked pit within a year or two. Building too close to a fence or deck is another. Using wet river rock or other porous stone is dangerous for the reason already mentioned. Forgetting drainage turns the pit into a bucket after every storm. And lighting a fire before the adhesive has cured can weaken the joints.
The fuel matters too. Burn seasoned, untreated hardwood. Pressure-treated lumber, painted scraps, and trash can release harmful fumes, and green wood just smokes.
Using It Safely
Keep a garden hose, a bucket of water, or a fire extinguisher within reach, and never leave a fire unattended. Don’t use gasoline or lighter fluid, especially to revive a fire that’s already burning. Keep children and pets back from the ring, and watch the wind. Sparks travel farther than you’d expect on a breezy night.
When you’re finished, let the wood burn down and spread the ashes so they cool. Coals can stay hot for a surprisingly long time, so scoop cooled ashes into a metal container and store it away from anything flammable.
Keeping It in Good Shape
A little care keeps the pit looking and working well. Clear out ash after it has cooled, since wet ash packs down and holds moisture against the liner. Check the adhesive joints each spring and reseat any block that has shifted. Look over the firebrick for cracks, and replace damaged pieces before they fall apart. A cover or a simple lid keeps rain and leaves out between uses, which also makes cleanup quicker the next time you light a fire.
Ready for the First Fire
Once the adhesive has cured and the weather is calm, stack a little kindling, light it with a long match, and add logs gradually. A fire pit that’s built on a solid base and used with care tends to last for many seasons, and the build itself is the hardest part you’ll do.