Category: Pergola & Trellis

  • Trellis for Plants and How to Match One to Your Climber

    Trellis for Plants and How to Match One to Your Climber

    The best trellis for plants depends less on how it looks and more on how the plant climbs. A pea plant grabs with tiny tendrils, a pole bean wraps its whole stem around a support, and a climbing rose does neither and just leans where you tie it. Give each one the wrong kind of frame and it flops, sprawls, or never gets going.

    So before you shop or build, work out what your plant actually does.

    Why Bother With a Trellis at All

    Training plants upward saves ground space, which matters in small gardens and raised beds. It also lifts leaves and fruit off the soil, so air moves around them and moisture dries faster. That can reduce some disease problems, and it makes harvesting easier on your back. Many climbers also simply look better growing up than sprawling across the ground.

    The Four Ways Plants Climb

    Twiners

    Twining plants wind their stems around whatever they find. Pole beans, morning glories, honeysuckle, and wisteria all do this. They need supports that are thin enough to wrap around, such as strings, narrow poles, wires, or slim lattice strips. A support that is much thicker than an inch or two gives them nothing to wrap, so a wide wooden post can leave a bean plant stranded.

    Tendril climbers

    Peas, cucumbers, grapes, and sweet peas send out slender curling tendrils that grab and coil. Clematis behaves similarly, using twisting leaf stalks. These plants need fine structures like mesh, netting, thin wire grids, or twiggy branches pushed into the soil. Thin crosspieces spaced a few inches apart work well, while smooth, wide panels do not.

    Clingers

    English ivy and climbing hydrangea attach themselves with small aerial roots or pads. They don’t need a trellis as much as a wall or a sturdy surface to hold on to. Be careful with them, because those roots can work into mortar, damage paint, and loosen wood. If you want one near your house, a freestanding frame set a little away from the wall is the safer choice.

    Scramblers and leaners

    Climbing roses and some jasmines have no true climbing mechanism. They send up long canes that need to be tied in place. These plants need a strong, open framework where you can attach stems every foot or so with soft ties. A wire grid on a wall or a solid wooden frame suits them better than fine netting.

    Quick Matching Guide

    Plant type Examples What works best
    Twiners Pole beans, morning glory, honeysuckle Poles, strings, thin wires, obelisks
    Tendril climbers Peas, cucumbers, grapes, clematis Mesh, netting, thin grids, twiggy supports
    Clingers English ivy, climbing hydrangea A sturdy wall or a freestanding frame nearby
    Scramblers Climbing roses, some jasmines Strong wire grids and frames with tie points

    Common Trellis Shapes

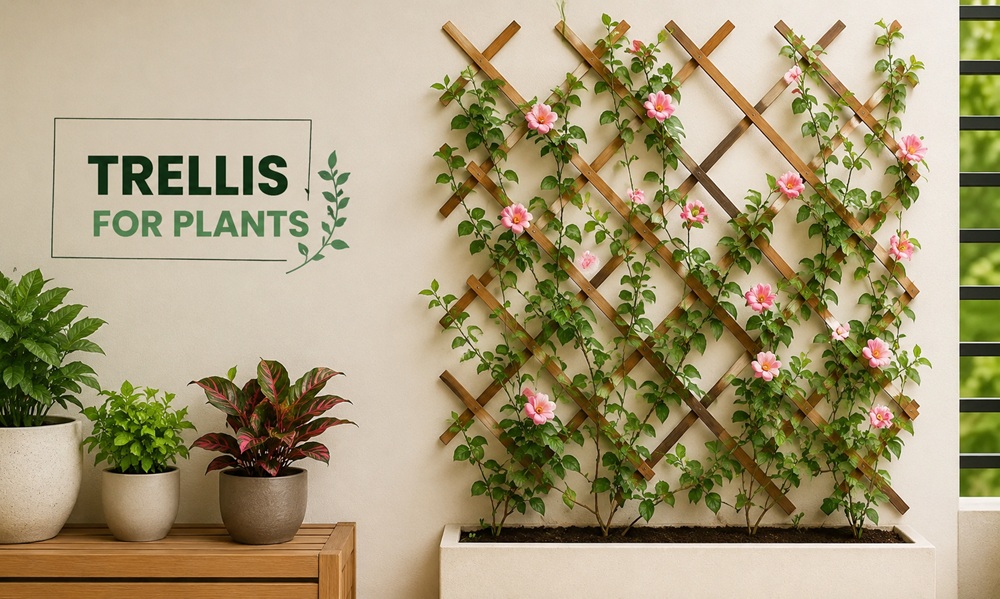
    Flat panels are the classic choice, set against a wall or fence or freestanding in a bed. They work well for most tendril climbers and scramblers.

    Obelisks and teepees are tall, narrow towers that look good in borders and containers. They suit twiners and lightweight climbers like sweet peas.

    Arches and arbors span a path and carry heavier plants such as roses and grapes, so the frame has to be stout and well anchored.

    A-frames lean two panels together and work well over garden beds for cucumbers, squash, and beans, since the fruit hangs down where it’s easy to pick.

    Netting stretched between posts is cheap and light, and it’s a favorite for peas and cucumbers. It needs strong end posts to stay taut.

    Trellis Ideas for Common Plants

    Peas do well on netting or a grid of thin wires about four to five feet tall, since their tendrils grab fine material easily. Pole beans prefer strings, narrow poles, or a teepee of canes that rise six feet or more. Cucumbers can climb a sturdy panel or an A-frame, and trained upward they produce straighter fruit that is easier to spot.

    For flowers, sweet peas thrive on mesh or twiggy branches, while clematis needs thin supports like wire or lattice strips near its base so it can start climbing early. Climbing roses want a heavy wire grid or wooden frame where each cane can be tied. Grapes need a very strong structure with posts set deep and wires that can bear a heavy crop. If you want a small container climber on a patio, a compact obelisk with a fast annual vine such as black-eyed Susan vine is a manageable place to start.

    Choosing Materials

    Wood looks natural and can be cut to any size. Cedar and redwood last longest outdoors without treatment, and other woods benefit from sealing. Metal frames, especially powder-coated steel or aluminum, are durable and slim, though metal can get hot in strong sun and may scorch tender stems against it. Bamboo is inexpensive and works well for seasonal crops, but it breaks down after a year or two. Plastic-coated mesh and nylon netting suit lightweight annuals and are simple to replace.

    For permanent plantings such as wisteria or grapes, invest in the strongest material you can. For annual vegetables, something cheaper and temporary usually does the job.

    Common Mistakes

    One frequent problem is picking a support the plant can’t grip, such as a smooth wide board for a tendril climber. Another is underestimating mature weight, which leads to leaning or collapsing frames by midsummer. Planting too close to the base crowds the roots, and tying stems too tightly can cut into growth as it thickens. Finally, many gardeners set the trellis up after the plant has already sprawled, which makes training harder. Installing the support at planting time keeps things simple.

    Size, Strength, and Anchoring

    A plant on a trellis adds weight every season, and wet foliage and wind add more. Match the strength of the frame to the mature size of the plant rather than the size you bring home from the nursery. Set posts deep enough to resist leaning, and brace tall freestanding frames, especially in windy areas. If you attach a panel to a wall, leave a gap of a couple of inches behind it for airflow, which helps prevent damp problems on the wall and the plant.

    Where to Put It

    Most flowering and fruiting climbers want several hours of direct sun. Pick the spot first, then choose the plant. In cold climates, a south- or west-facing wall can create a warm pocket, while in hot ones a trellis can provide shade for plants growing beneath it. Leave space around the base of the trellis so roots aren’t crowded and you can reach the plants for watering and pruning.

    Training the Plant

    Young plants rarely find the support on their own. Guide the first shoots toward the trellis and tie them loosely with soft twine, plant clips, or strips of cloth. Avoid wire or tight ties that can cut into the stem as it thickens. Tendril climbers usually need only an occasional nudge, while scramblers need regular tying as they grow. Spread stems out sideways when you can, since horizontal training often leads to more flowers and fruit than letting everything shoot straight up.

    End-of-Season Care

    For annuals, pull spent plants and compost healthy material, then clean the trellis so disease doesn’t carry over. For perennials, prune at the proper time for the species and check ties for tightness. Look over wood for rot, metal for rust, and screws for looseness. Store bamboo and netting somewhere dry over winter.

    If you’re still unsure which one to pick, start with the plant. Look at how it climbs, choose a support it can really grip, and build or buy that. The trellis only does its job when the plant can use it.
  • How to Make a Trellis Three Different Ways

    How to Make a Trellis Three Different Ways

    A trellis is just a frame that gives climbing plants something to hold on to. You can make one in an afternoon with a few boards and a box of screws, or in under an hour with bamboo canes and a ball of twine. The right way to make a trellis depends on what you’re growing, how much weight it needs to carry, and where it will stand.

    Below are three builds that cover most garden situations. The first is a sturdy wooden ladder trellis, the second is a quick bamboo teepee, and the third is a wire trellis that runs along a wall or fence. Pick the one that matches your plants and your patience.

    A Few Decisions Before You Start

    Think about the plant first. Peas and sweet peas are light and happy on thin supports. Pole beans and cucumbers need something a bit stronger. Heavy climbers such as grapes, wisteria, and mature clematis put real load on a frame, and a flimsy trellis will lean or collapse under them.

    Next, think about height. Choose a trellis that is as tall as the plant will grow, plus a little extra, because most climbers keep reaching long after you expect them to stop. Then think about placement. Most flowering and fruiting climbers want several hours of direct sun, so set the trellis where light reaches it.

    Build Best for Effort Main materials
    Wooden ladder trellis Peas, beans, clematis, sweet peas An afternoon Wood strips, screws
    Bamboo teepee Pole beans, cucumbers, sweet peas Under an hour Bamboo canes, twine
    Wall wire trellis Climbing roses, jasmine, espaliered fruit A couple of hours Eye screws, galvanized or stainless wire

    Build One, a Wooden Ladder Trellis

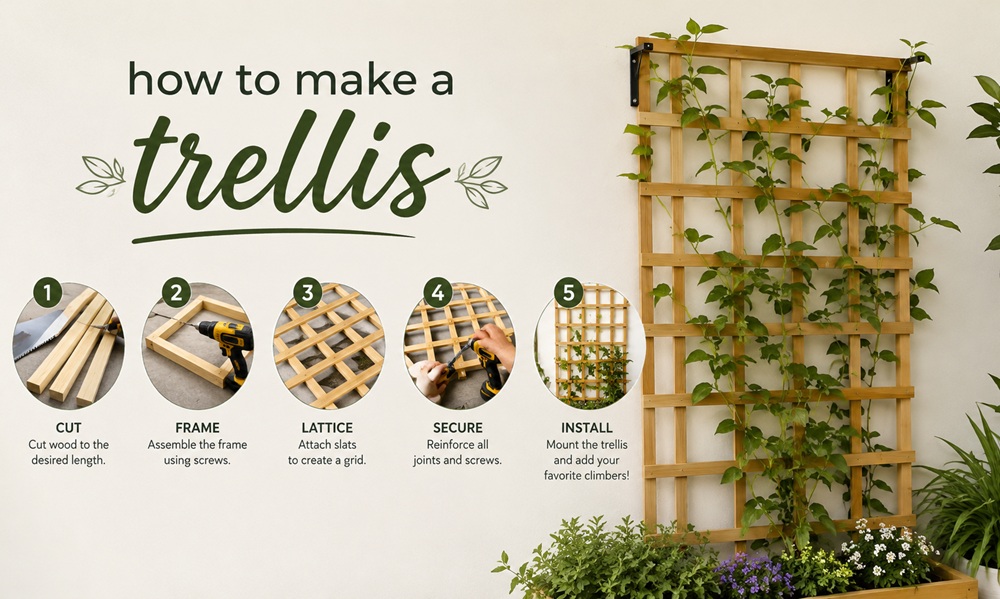
    This design looks like a tall ladder. It stands on its own in a bed or can lean against a wall.

    You’ll need two uprights cut from 2×2 lumber, around six feet long for a typical bed. Add crosspieces cut from 1×2 strips, and wood screws, a drill, a saw, a tape measure, and a square. Cedar and redwood resist decay naturally and are popular for garden projects. Some gardeners prefer them around edible plants, though pressure-treated lumber is also widely used, so follow the manufacturer’s guidance if you go that route.

    1. Cut the two uprights to the same length and lay them flat on the ground, parallel, about 18 to 24 inches apart.
    2. Mark crosspiece positions every 8 to 12 inches along both uprights, starting a foot from the bottom.
    3. Cut the 1×2 strips to the width between the uprights, plus the width of the wood if you want them to sit on the outside faces.
    4. Drill pilot holes at each mark so the wood doesn’t split, then screw each crosspiece to the uprights with two screws per end.
    5. Check that the frame is square by measuring the diagonals. If they match, you’re set.
    6. Sand rough edges and apply an exterior sealer if you like. Let it dry fully before planting.

    To anchor it, drive the bottoms of the uprights 10 to 12 inches into the soil, or screw the frame to the side of a raised bed. In windy spots, add a short stake on each side and tie it off.

    Build Two, a Bamboo Teepee

    This one is quick and cheap, and it works nicely for annual climbers.

    Gather five or six bamboo canes between six and eight feet long. Push each cane 8 to 12 inches into the soil in a circle about two feet across, leaning the tops together. Bind them tightly near the top with strong twine, wrapping several times and finishing with a firm knot. Then wind twine around the canes at intervals of about a foot, pulling it snug at each cane, so the climbers have horizontal rungs to grab.

    Leave one gap in the circle if you want easy access for harvesting. Sweet peas, pole beans, and cucumbers all grow well on this shape, and kids tend to enjoy sitting inside a bean teepee in summer. Bamboo lasts a season or two outdoors. At the end of the season, pull it up and store it dry so it holds up longer.

    Build Three, a Wire Trellis for a Wall or Fence

    A wire trellis is almost invisible, which makes it good for climbing roses, jasmine, and trained fruit trees on a visible wall.

    Choose the hardware

    Use galvanized or stainless steel wire so it doesn’t rust, and eye screws or heavy-duty wall hooks to hold it. For a brick or masonry wall, drill with a masonry bit and use appropriate wall plugs. For a wood fence or siding, screw directly into solid framing instead of thin boards. Heavier plants need stronger hardware, so size it to the plant, not just the look.

    Space and string the wire

    Mark rows about 12 inches apart, starting 12 to 18 inches above the ground. Install an eye screw at each end of every row, and add a middle support for longer runs. Use eye screws with enough length that the wire sits two to three inches away from the wall, which gives air room to move around the plant and cuts down on mildew. Thread the wire through one eye, pull it taut by hand, loop it back, and twist it off. Turnbuckles or wire tensioners make it easy to tighten later if the wire sags.

    Train the plant

    Tie the first shoots loosely to the wire with soft garden twine, fanning them out sideways rather than straight up, since horizontal growth tends to encourage more flowers and fruit. Check the ties each season so they don’t bite into growing stems.

    Sizing the Build to the Plant

    Dimensions are easier to settle if you work backward from the plant. Check the mature height and spread on the plant tag or seed packet, then add a foot to the height so the top shoots have somewhere to go. For a pair of pea rows, a trellis four to five feet tall is usually plenty. For pole beans and cucumbers, six to eight feet gives them room to keep producing. Width matters less than strength, but a frame that is much narrower than the planted row leaves outer plants without support.

    Weight is the other factor. A mature grapevine or wisteria can weigh far more than a bean vine, and wet foliage in a storm adds still more. If you’re unsure, build heavier than you think you need. Thicker uprights, closer fastener spacing, and deeper anchoring cost very little compared with rebuilding a collapsed trellis in midsummer.

    Making Any Trellis Last Longer

    Seal or stain wood before planting and again every couple of years. Replace twine annually, since it rots. Check screws and eye bolts at the start of each growing season, because plants add weight as they mature. Wire loosens over time, so retighten it in spring.

    Where to Place It

    Set the trellis where the plant will get several hours of direct sun, and leave room to walk around or reach it for pruning and harvesting. If the trellis stands against a wall or fence, keep it a couple of inches off the surface so air can circulate. In windy yards, place taller structures where a building or hedge breaks the worst of the gusts, or add braces at the base.

    Mistakes to Skip

    The most common one is building too small. A trellis that fits a young plant usually can’t handle the full-grown vine. Another is placing it in shade and wondering why the plant won’t bloom. Planting too close to the base crowds the roots and invites rot, so leave a few inches between the stems and the frame. Finally, check that wire and twine don’t girdle woody stems as they thicken.

    A homemade trellis doesn’t need to be fancy. It needs to be strong enough, tall enough, and in the right spot, and the plants will take care of the rest.

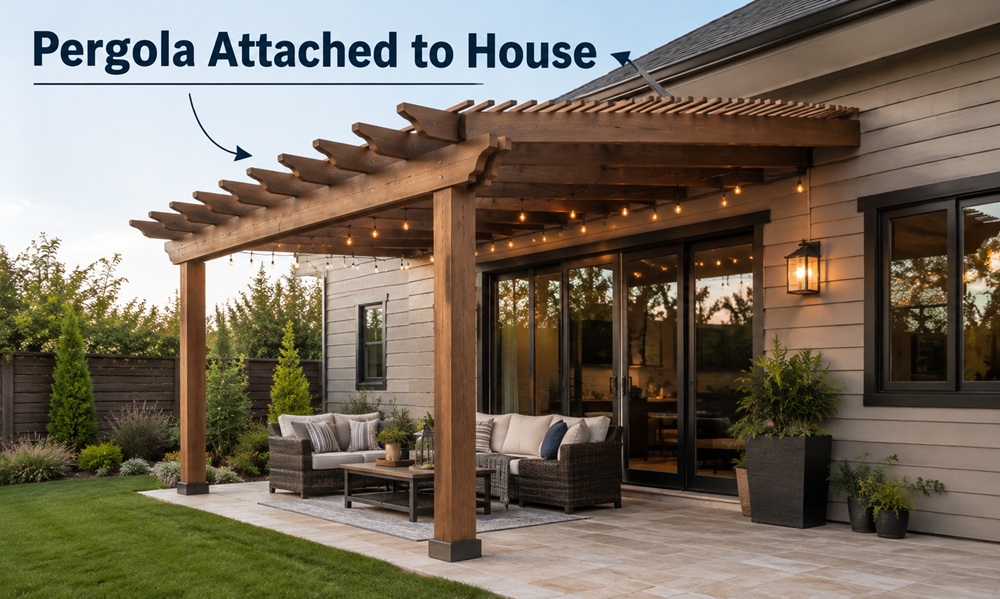
  • Pergola Attached to House and What to Settle Before You Build

    Pergola Attached to House and What to Settle Before You Build

    Yes, you can attach a pergola to your house, and it’s one of the most popular ways to stretch living space outdoors. A pergola attached to the house uses the wall to carry one side of the structure. That means fewer posts, a natural connection to a back door or patio, and shade that begins right where you step outside. The catch is that you’re now connecting something heavy to your home’s frame and its weatherproofing, so the details matter far more than they do on a freestanding build.

    What follows covers how the attachment works, where it tends to go wrong, and how to decide between a true attached design and a freestanding one set close to the wall.

    Attached or Freestanding Beside the House

    People often blur these two, but they’re different approaches.

    An attached pergola fastens a horizontal board, called a ledger, directly to the house framing. The rafters rest on that ledger on one side and on a beam held up by posts on the other.

    A freestanding pergola placed next to the house has its own posts on every side. It sits a few inches to a few feet from the wall and doesn’t touch the building at all.

    Neither is automatically better. Attached designs save materials and give a seamless look against the wall. Freestanding ones leave your siding alone, keep structural loads and moisture away from the house, and are easier to remove or move later. If your wall is brick veneer, stucco, or something you’d rather not cut into, the freestanding route takes a lot of risk off the table.

    How the Connection Works

    The ledger board

    The ledger is usually a pressure-treated 2×8 or 2×10 fastened through the siding and into solid framing behind it, such as the rim joist or wall studs. Fastening into siding or sheathing alone won’t hold. Builders typically use structural screws or lag screws sized and spaced to suit the loads, and the exact pattern depends on your local code and the span of the pergola.

    Flashing and water

    Water is the real enemy here. Metal flashing goes above the ledger and tucks under the siding or weather barrier so rain runs over the connection instead of behind it. Caulk by itself isn’t a dependable seal, because it cracks and shrinks over time. Some builders also use spacers to leave a small gap between the ledger and the wall so water and debris can’t get trapped. Local code may have its own requirements, so follow those.

    Matching the method to your wall

    Wood-framed walls with siding are the most straightforward, since the framing is easy to find and fasten into. Brick veneer is not structural, so a ledger has to reach the framing behind the brick, which complicates the job. Stucco and concrete block each call for specific anchors and sealing methods. When the wall type is anything other than ordinary siding over wood framing, getting advice from a pro before you buy materials is money well spent.

    Permits and Structural Checks

    An attached structure is more likely to need a permit than a freestanding one, because it ties into the house. Inspectors may look at footing depth, ledger fasteners, and flashing. They may also ask about snow load and wind uplift, since an attached pergola passes some of its forces into the wall. Your building department can tell you what applies in your area, and a structural engineer can sign off on unusual spans or heavy covers. Skipping this step can cause trouble later, particularly if you sell the house.

    Height and Placement

    Before settling on the layout, walk the wall and note everything the pergola could collide with.

    • Windows and doors, including how far they swing open
    • Gutters, downspouts, and the edge of the roof overhang
    • Dryer vents, hose bibs, electrical meters, and outdoor outlets
    • Air conditioner units and gas meters that need clearance for service
    • Second-story windows, if the pergola will sit below them

    Aim for a ledger height that clears the door frame with room to spare, and make sure the beam side still leaves comfortable headroom. If the pergola will have a solid or watertight cover, plan a slight slope away from the house so water drains off instead of pooling against the wall. Open-rafter designs don’t need a slope for drainage.

    Light, Heat, and Airflow Inside the House

    Shade is the main reason for adding a pergola, but it affects the rooms behind it too. On a south-facing wall, a pergola can reduce summer sun through windows and doors, and that lowers the heat building up indoors. The same shade can darken those rooms in winter, when you’d likely welcome the light. Slatted or louvered roofs, and plants that lose their leaves in autumn, give you more flexibility. Think about which rooms face the pergola and how you use them before you commit to a dense cover.

    Problems and How to Avoid Them

    Water damage behind the ledger is the most serious risk. Proper flashing, solid fasteners, and a clean installation prevent it, and a yearly look at the joint catches early signs of trouble.

    A sagging beam usually means the lumber was too light for the span or the posts weren’t set on proper footings. Choose the beam size from a span table or a supplier’s guidance, and don’t stretch it.

    Rot at the base of posts comes from sitting in wet soil or on wet concrete. Metal standoff post bases keep the wood slightly above the surface and let it dry out.

    Pulling away from the wall happens when fasteners reach only siding or sheathing. Always connect into framing.

    Snow buildup matters where winters are heavy, especially with a solid or fabric cover. Design for the expected load or remove the cover during the snowy season.

    Attaching to an Existing Deck or Patio

    Many people want to tie a pergola into a deck they already have. That’s a different question from attaching to the house wall. A deck is usually designed to carry people and furniture, not the added weight and wind load of a roof structure, so posts bolted to the deck surface or railing can overstress it. The safer approach is to run the pergola posts down through the deck to their own footings, or to have the deck inspected and reinforced by a professional. On a concrete patio, check the slab thickness and use anchors rated for the post loads, or cut out sections for proper footings.

    What Affects the Cost

    An attached pergola needs fewer posts, but the labor is more careful. Flashing, ledger fasteners, and wall repairs add time. Size, lumber type, footings, permit fees, and any electrical work for lighting or fans make up the rest of the bill. A contractor’s quote will reflect your wall type, and brick or stucco usually costs more than standard siding. Get at least two written quotes that break out the attachment details so you can compare them fairly.

    DIY or Hire a Pro

    A homeowner with solid carpentry skills can handle an attachment to wood framing and siding, as long as the flashing is done right and the permit is in place. Hiring a pro makes more sense when the wall is brick or stucco, the connection reaches a second story or roofline, electrical work is involved, or you’re unsure about code. A contractor or structural engineer costs less than repairing water damage inside a wall.

    The best attached pergolas are the ones you stop thinking about after a year, because the flashing keeps the wall dry, the beam stays level, and the shade does what you built it to do.

  • What Is a Pergola? A Plain-English Explanation

    What Is a Pergola? A Plain-English Explanation

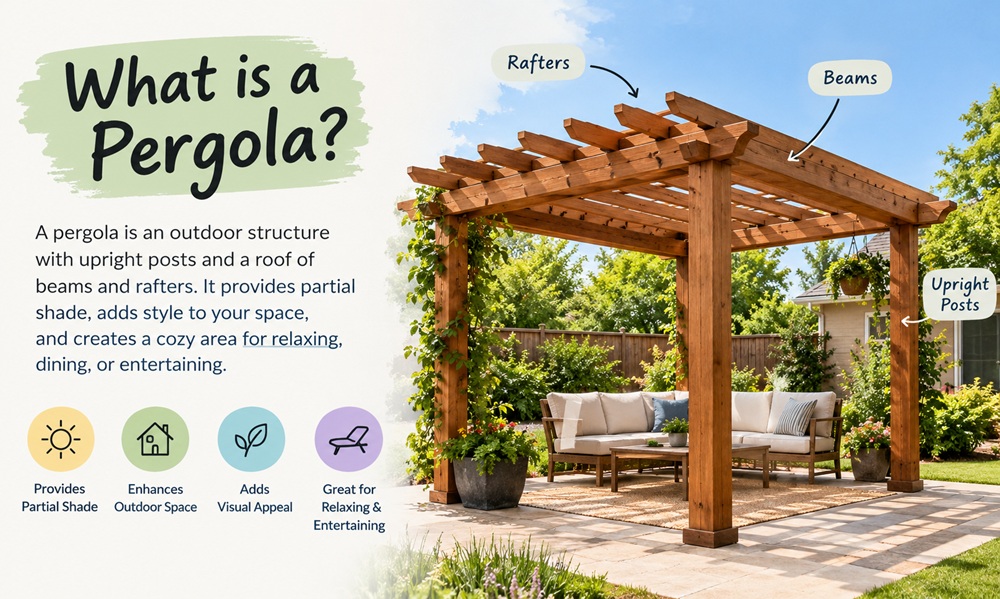
    A pergola is an outdoor structure with vertical posts that hold up a grid of beams and open rafters, forming a partly shaded area without a solid roof. That open top is what sets it apart from most other backyard structures. Light passes through the gaps, plants can climb the frame, and the space underneath feels sheltered without feeling closed in.

    The word traces back to the Latin pergula, which described a projecting roof or a framework for vines, and it reached English through Italian. The idea is old. Garden designers have been training grapevines and roses over frames like this for centuries. What has changed is the range of materials and the ways people use the space today.

    The Basic Parts

    Every pergola, from a simple wooden frame to a powder-coated aluminum model, is built from the same few components.

    The posts carry the weight and anchor the structure to the ground, a concrete slab, or a deck. Beams span the posts, usually in one direction, and form the main horizontal frame. Rafters rest on or between the beams and run the other way, which gives a pergola its familiar grid look. Many designs add a final layer of thinner slats across the rafters to increase shade.

    Some pergolas stand on their own with four or more posts. Others attach to a house wall along one side, which saves on posts and creates a covered extension of the home. The right choice depends on the space, the budget, and how the structure will be used.

    Pergola, Gazebo, Arbor, or Pavilion

    People mix these names up all the time, partly because the structures overlap. The simplest way to tell them apart is to look at the roof and the scale.

    Structure Roof Typical size and purpose
    Pergola Open grid of rafters, sometimes with slats or a canopy Medium to large, shade over a patio, walkway, or seating area
    Gazebo Solid roof, often with railings or screened sides Freestanding shelter for sitting and gathering
    Arbor Open frame, usually a small arch Narrow, marks an entrance and supports climbing plants
    Pavilion Solid roof with open sides Large, built for group gatherings in parks or big yards

    An arbor is basically a pergola’s smaller cousin. A gazebo sheds rain, while a pergola in its basic form does not.

    Styles You’ll See

    Traditional pergolas have thick square posts, exposed rafter tails with scrolled or angled ends, and often a stained wood finish. They suit older homes and cottage-style gardens.

    Craftsman designs lean on heavier timbers, tapered columns, and visible joinery, so they tend to feel solid and grounded. Modern pergolas strip everything back to clean lines, slim posts, and flat-topped beams, and they’re frequently made from aluminum or steel in black, white, or bronze finishes.

    Then there are the adjustable versions. Louvered pergolas have roof slats that tilt open for sun or closed against rain, and retractable models pull a fabric cover along tracks. Both give you more control than a fixed grid, though they cost more and need careful installation.

    Materials and What Each One Offers

    Wood is the traditional choice. Cedar and redwood resist decay naturally, and pressure-treated pine costs less but needs good sealing. Wood can be stained or painted, and it’s the easiest material to cut into custom shapes, which is why most DIY pergolas are wooden.

    Vinyl needs little upkeep and doesn’t rot, though it can look less natural and may need internal reinforcement over longer spans. Aluminum is lightweight and rust resistant, which makes it a favorite for louvered and modern designs. Steel is strong and suits slim profiles, but it needs a protective coating to keep rust away. Fiberglass shows up in some kits, imitating wood grain while shrugging off moisture.

    Whatever the material, read what the manufacturer or lumber supplier says about span, load, and care. Those details vary from product to product.

    How Much Shade Does a Pergola Give?

    Less than a roof, and that’s the point. The amount depends on how closely the rafters are spaced, whether slats are added, which direction the structure faces, and what grows or hangs over it. Rafters set close together cast more shade than widely spaced ones. Vines such as grapes or wisteria fill in gradually over a few growing seasons. Fabric canopies and shade sails add shade when you want it and can be removed in cooler months.

    If rain protection matters too, a louvered roof or a waterproof cover is worth a look. Compare those options with a solid-roof structure before you decide, since the price and installation effort are very different.

    Ways People Actually Use Them

    A pergola over a patio turns bare concrete into an outdoor dining room. One beside a pool gives swimmers a place to cool off. Over a hot tub it adds privacy when curtains or plants hang from the frame. In a garden it marks a path or frames a view, and it makes a natural support for climbing roses, clematis, and grapevines.

    Some homeowners build one over an outdoor kitchen or grill. That works only if the frame stays a safe distance from the heat source and meets local fire rules, so check before you commit to the layout.

    Size, Placement, and Sun

    Size follows function. A dining area usually needs enough room for a table, chairs pulled out, and a walking path around them. A walkway pergola can be narrow but should be tall enough that vines and people both fit comfortably underneath.

    Orientation matters because the sun moves. A pergola on the west side of a house catches strong afternoon light, while one on the north side may stay shaded and cool all day. Watch your yard at different hours before you pick a spot.

    Upkeep and Cost Factors

    Wood needs sealing or staining every so often, and the interval depends on climate and finish. Metal and vinyl mostly need washing, with a check on fasteners and finishes once a year.

    Cost swings widely. Material, size, design complexity, and whether you build it yourself or hire a contractor are the biggest drivers, followed by footings, electrical work for lighting or fans, and any permit fees. Pre-made kits sit at the lower end of the range while custom work and louvered roofs sit at the top. Getting two or three written quotes is the fastest way to see what’s realistic where you live.

    Plants and Lighting

    Climbing plants and pergolas have gone together for as long as the structure has existed. Grapes, wisteria, clematis, and climbing roses are popular picks, though heavy vines such as mature wisteria can add real weight, so the frame should be sized for them. Many owners also hang string lights, lanterns, or low-voltage fixtures from the rafters, which makes the space usable after dark. Outdoor fans and heaters can be added to some designs, but electrical work should follow local code and is often best left to a licensed electrician.

    Permits and Local Rules

    Whether you need a permit depends on where you live, how large the structure is, and whether it attaches to the house. Setback rules, height limits, and homeowners’ association requirements can apply as well. Check with your local building department before buying materials, since the answer can reshape the design.

    Is a Pergola Worth Adding?

    Good reasons to build one include creating a defined outdoor room, adding partial shade, supporting plants, and lifting the look of a yard. The trade-offs are that a basic pergola won’t keep rain out, wood needs periodic care, and the price climbs quickly with size and material.

    Picture your patio on a July afternoon. If you’d happily sit under dappled shade with a cold drink and a few green vines overhead, a pergola probably fits. If what you really want is a dry seat during a storm, a gazebo or a covered patio may serve you better.

  • How to Build a Pergola in a Weekend or Two

    How to Build a Pergola in a Weekend or Two

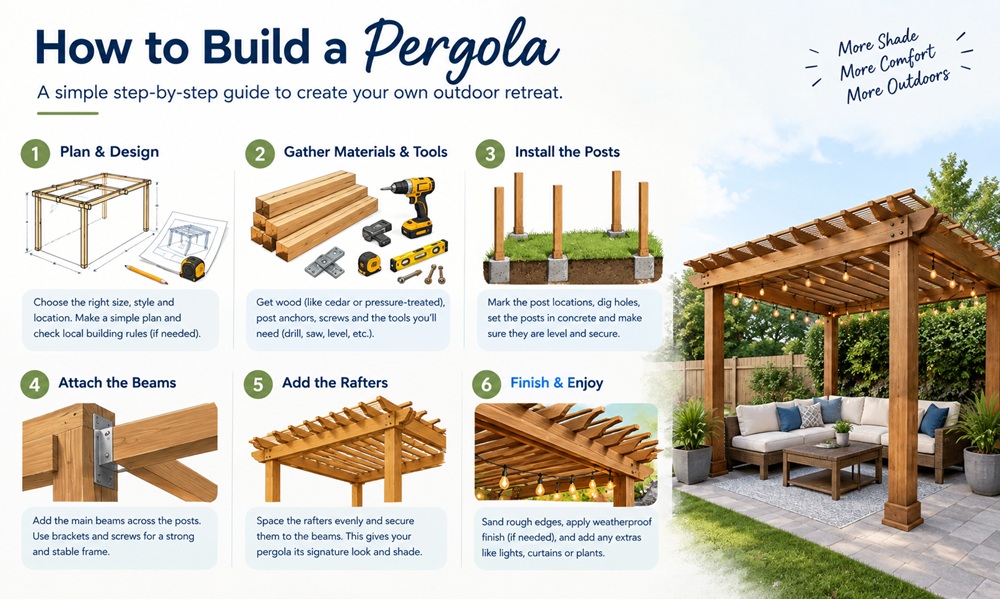
    To build a pergola, you mark the layout, set four posts in solid footings, fasten two beams across them, lay rafters over the beams, and then seal the wood. A freestanding 10 by 10 foot pergola is a realistic project for anyone who is comfortable with a drill, a level, and a saw, provided a second person helps with the heavy lifting. Plan on one weekend for a simple design and a second if the concrete needs time to cure or the weather turns on you.

    Most pergola problems begin before the first board is cut. A footing a few inches out of square or a beam that’s too light for its span shows up later as a wobble or a sag, so the early steps deserve the most patience.

    Plan the Footprint and Check Local Rules

    Start with stakes and string. Mark the outer corners, then stand back and look at the outline from the house and from the spot where you’ll actually sit. A 10 by 10 foot footprint fits a small dining set comfortably. A 12 by 12 gives people room to move around the table, and anything under 8 by 8 tends to feel more like a doorway than a place to relax.

    Before you dig, contact your local utility locator. In the United States that means calling 811, which is free and gets buried lines marked. Then ask your building department whether a permit is required. Rules depend on the size and height of the structure and its distance from property lines, and homeowners’ associations sometimes add requirements of their own. A short phone call now costs far less than moving a finished frame.

    Materials and Tools

    A basic 10 by 10 foot pergola with a post at each corner needs roughly the following.

    • Four 6×6 posts, or 4×4 posts for a lighter design, rated for ground contact if they’ll touch soil
    • Two beams, commonly 2×8 or 2×10 lumber, either single or doubled depending on the design
    • Rafters, commonly 2×6 boards, cut long enough to overhang the beams
    • Optional 2×2 or 1×2 slats to lay across the rafters for extra shade
    • Concrete mix, gravel, and metal post bases if you plan to use surface-mounted posts
    • Carriage bolts or structural screws with washers, plus exterior-rated deck screws
    • Four short 2×4 or 4×4 pieces for optional knee braces
    • Exterior stain or sealer

    For tools, bring a post hole digger or auger, a four-foot level, a speed square, a tape measure, a circular saw or miter saw, a drill with a good bit set, a stepladder, clamps, and mason’s string. Safety glasses and hearing protection belong on the list too.

    Wood choice shapes both the budget and the upkeep. Pressure-treated pine costs the least and lasts well when it’s rated for the exposure. Cedar and redwood cost more, resist decay naturally, and take stain beautifully. Whatever you pick, sight down each board at the store and leave the warped ones behind. Crooked lumber fights you at every step.

    Build It Step by Step

    Lay out and dig the footings

    Square the layout by measuring the diagonals between opposite corners. When the two measurements match, the rectangle is square. Dig each hole to the depth your local code requires. In cold climates that means below the frost line, so winter ground movement doesn’t push the posts upward. Make each hole roughly three times as wide as the post, and spread a few inches of gravel across the bottom for drainage.

    Set the posts

    Stand a post in its hole and check for plumb on two adjacent faces. Brace it with 2x4s staked into the ground, then pour concrete around it and slope the top away from the wood so water runs off. Check plumb again before the concrete starts to set. Give it the cure time printed on the bag before you put any load on the posts.

    If you’d rather keep wood out of the soil, pour concrete piers with anchor hardware and bolt metal post bases to them. Posts that sit above ground tend to last longer because the base stays drier.

    Cut the posts to height

    Think about headroom first. Seven feet is a bare minimum for walking underneath, and many builders go to eight or nine feet so the space feels open. Mark the finished height on one post, use a laser or water level to carry that mark to the other three, and cut each at the line.

    Attach the beams

    Beams can sit on top of the posts or bolt to their sides. Side-mounted beams are easier for a first project. Clamp a beam at the right height, drill through the post and beam together, and fasten with half-inch carriage bolts or structural screws and washers. Let the beams extend 12 to 24 inches past the posts so the ends can take a decorative cut later.

    Check that both beams are level and parallel before the final tightening. Everything above them depends on that.

    Add the rafters

    Rafters run across the beams at right angles. Space them 16 to 24 inches apart, and tighter if you plan to add slats or a fabric cover. Mark the positions on both beams so the layout stays even, then secure each rafter with rafter ties or angled screws driven from both sides. Cut the rafter ends to your chosen profile before installing, whether square, angled, or curved from a traced template, so they all match.

    Span matters here. Longer spans need deeper lumber, and the right size depends on the wood species and local loads. If you’re going beyond a typical ten foot span, check a span table or ask your lumber supplier.

    Brace, slat, and finish

    Knee braces cut at 45 degrees between each post and beam stiffen the frame against sideways movement. Add one at each corner. For more shade, lay slats across the rafters at right angles. Sand rough edges, seal the cut ends of every board, and apply stain or sealer to all sides before the wood has a chance to weather.

    Mistakes That Cost People the Most

    Shallow or skipped footings cause the worst damage. Posts set in loose soil lean over time, and by then the fix means taking the frame apart. Untreated lumber near the ground is the next big one, because rot starts at the base. Other common errors include relying on nails alone, which loosen as wood moves, forgetting to check for square before pouring concrete, and leaving cut ends unsealed.

    What Affects the Cost

    Price depends mostly on size, lumber species, and the extras you add. A basic pressure-treated frame costs a fraction of a cedar or redwood one, and decorative cuts, slats, and a quality finish all push the total up. Concrete and hardware look small on the receipt but add up, and delivery fees matter when you’re buying a lot of lumber. Write out a full cut list, price it at two suppliers, and leave a cushion for the board you’ll inevitably cut wrong.

    Keeping It Sound After the Build

    Check bolts and brackets once a year, especially after a windy season. Reapply sealer when water stops beading on the surface, which in many climates comes around every couple of years. Climbing plants such as clematis or wisteria add shade over time, though heavy vines add weight, so match the plant to your frame.

    A pergola built on solid footings with straight lumber can serve a backyard for many years. Take your time with the layout, and the rest of the build tends to fall into place.