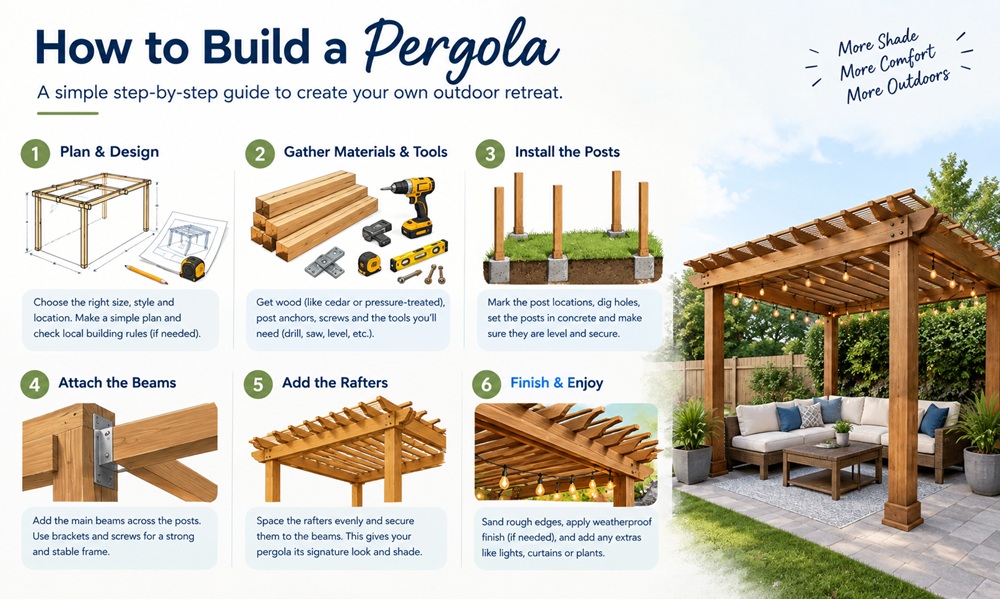
To build a pergola, you mark the layout, set four posts in solid footings, fasten two beams across them, lay rafters over the beams, and then seal the wood. A freestanding 10 by 10 foot pergola is a realistic project for anyone who is comfortable with a drill, a level, and a saw, provided a second person helps with the heavy lifting. Plan on one weekend for a simple design and a second if the concrete needs time to cure or the weather turns on you.
Most pergola problems begin before the first board is cut. A footing a few inches out of square or a beam that’s too light for its span shows up later as a wobble or a sag, so the early steps deserve the most patience.
Plan the Footprint and Check Local Rules
Start with stakes and string. Mark the outer corners, then stand back and look at the outline from the house and from the spot where you’ll actually sit. A 10 by 10 foot footprint fits a small dining set comfortably. A 12 by 12 gives people room to move around the table, and anything under 8 by 8 tends to feel more like a doorway than a place to relax.
Before you dig, contact your local utility locator. In the United States that means calling 811, which is free and gets buried lines marked. Then ask your building department whether a permit is required. Rules depend on the size and height of the structure and its distance from property lines, and homeowners’ associations sometimes add requirements of their own. A short phone call now costs far less than moving a finished frame.
Materials and Tools
A basic 10 by 10 foot pergola with a post at each corner needs roughly the following.
- Four 6×6 posts, or 4×4 posts for a lighter design, rated for ground contact if they’ll touch soil
- Two beams, commonly 2×8 or 2×10 lumber, either single or doubled depending on the design
- Rafters, commonly 2×6 boards, cut long enough to overhang the beams
- Optional 2×2 or 1×2 slats to lay across the rafters for extra shade
- Concrete mix, gravel, and metal post bases if you plan to use surface-mounted posts
- Carriage bolts or structural screws with washers, plus exterior-rated deck screws
- Four short 2×4 or 4×4 pieces for optional knee braces
- Exterior stain or sealer
For tools, bring a post hole digger or auger, a four-foot level, a speed square, a tape measure, a circular saw or miter saw, a drill with a good bit set, a stepladder, clamps, and mason’s string. Safety glasses and hearing protection belong on the list too.
Wood choice shapes both the budget and the upkeep. Pressure-treated pine costs the least and lasts well when it’s rated for the exposure. Cedar and redwood cost more, resist decay naturally, and take stain beautifully. Whatever you pick, sight down each board at the store and leave the warped ones behind. Crooked lumber fights you at every step.
Build It Step by Step
Lay out and dig the footings
Square the layout by measuring the diagonals between opposite corners. When the two measurements match, the rectangle is square. Dig each hole to the depth your local code requires. In cold climates that means below the frost line, so winter ground movement doesn’t push the posts upward. Make each hole roughly three times as wide as the post, and spread a few inches of gravel across the bottom for drainage.
Set the posts
Stand a post in its hole and check for plumb on two adjacent faces. Brace it with 2x4s staked into the ground, then pour concrete around it and slope the top away from the wood so water runs off. Check plumb again before the concrete starts to set. Give it the cure time printed on the bag before you put any load on the posts.
If you’d rather keep wood out of the soil, pour concrete piers with anchor hardware and bolt metal post bases to them. Posts that sit above ground tend to last longer because the base stays drier.
Cut the posts to height
Think about headroom first. Seven feet is a bare minimum for walking underneath, and many builders go to eight or nine feet so the space feels open. Mark the finished height on one post, use a laser or water level to carry that mark to the other three, and cut each at the line.
Attach the beams
Beams can sit on top of the posts or bolt to their sides. Side-mounted beams are easier for a first project. Clamp a beam at the right height, drill through the post and beam together, and fasten with half-inch carriage bolts or structural screws and washers. Let the beams extend 12 to 24 inches past the posts so the ends can take a decorative cut later.
Check that both beams are level and parallel before the final tightening. Everything above them depends on that.
Add the rafters
Rafters run across the beams at right angles. Space them 16 to 24 inches apart, and tighter if you plan to add slats or a fabric cover. Mark the positions on both beams so the layout stays even, then secure each rafter with rafter ties or angled screws driven from both sides. Cut the rafter ends to your chosen profile before installing, whether square, angled, or curved from a traced template, so they all match.
Span matters here. Longer spans need deeper lumber, and the right size depends on the wood species and local loads. If you’re going beyond a typical ten foot span, check a span table or ask your lumber supplier.
Brace, slat, and finish
Knee braces cut at 45 degrees between each post and beam stiffen the frame against sideways movement. Add one at each corner. For more shade, lay slats across the rafters at right angles. Sand rough edges, seal the cut ends of every board, and apply stain or sealer to all sides before the wood has a chance to weather.
Mistakes That Cost People the Most
Shallow or skipped footings cause the worst damage. Posts set in loose soil lean over time, and by then the fix means taking the frame apart. Untreated lumber near the ground is the next big one, because rot starts at the base. Other common errors include relying on nails alone, which loosen as wood moves, forgetting to check for square before pouring concrete, and leaving cut ends unsealed.
What Affects the Cost
Price depends mostly on size, lumber species, and the extras you add. A basic pressure-treated frame costs a fraction of a cedar or redwood one, and decorative cuts, slats, and a quality finish all push the total up. Concrete and hardware look small on the receipt but add up, and delivery fees matter when you’re buying a lot of lumber. Write out a full cut list, price it at two suppliers, and leave a cushion for the board you’ll inevitably cut wrong.
Keeping It Sound After the Build
Check bolts and brackets once a year, especially after a windy season. Reapply sealer when water stops beading on the surface, which in many climates comes around every couple of years. Climbing plants such as clematis or wisteria add shade over time, though heavy vines add weight, so match the plant to your frame.
A pergola built on solid footings with straight lumber can serve a backyard for many years. Take your time with the layout, and the rest of the build tends to fall into place.