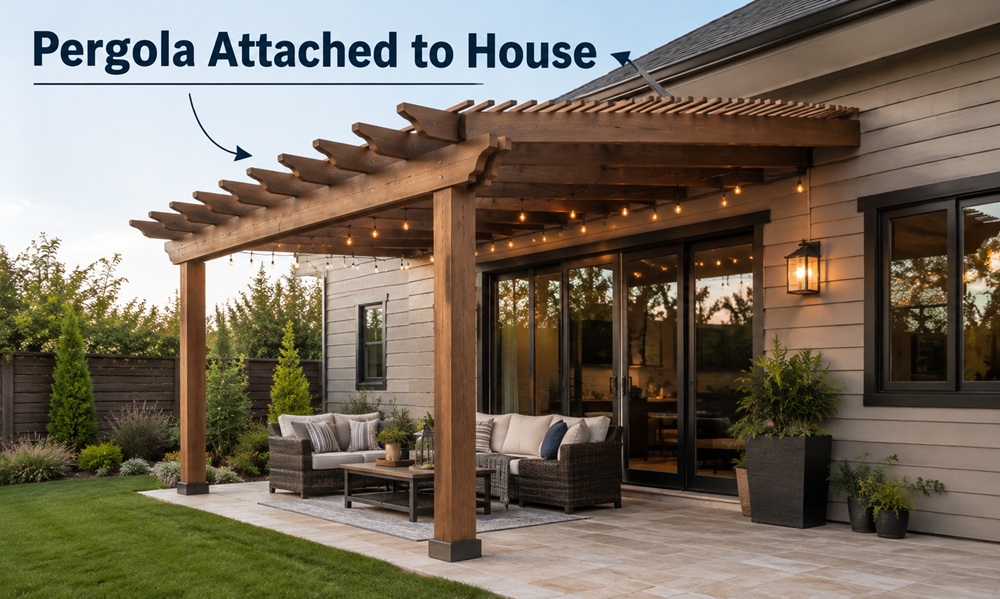
Yes, you can attach a pergola to your house, and it’s one of the most popular ways to stretch living space outdoors. A pergola attached to the house uses the wall to carry one side of the structure. That means fewer posts, a natural connection to a back door or patio, and shade that begins right where you step outside. The catch is that you’re now connecting something heavy to your home’s frame and its weatherproofing, so the details matter far more than they do on a freestanding build.
What follows covers how the attachment works, where it tends to go wrong, and how to decide between a true attached design and a freestanding one set close to the wall.
Attached or Freestanding Beside the House
People often blur these two, but they’re different approaches.
An attached pergola fastens a horizontal board, called a ledger, directly to the house framing. The rafters rest on that ledger on one side and on a beam held up by posts on the other.
A freestanding pergola placed next to the house has its own posts on every side. It sits a few inches to a few feet from the wall and doesn’t touch the building at all.
Neither is automatically better. Attached designs save materials and give a seamless look against the wall. Freestanding ones leave your siding alone, keep structural loads and moisture away from the house, and are easier to remove or move later. If your wall is brick veneer, stucco, or something you’d rather not cut into, the freestanding route takes a lot of risk off the table.
How the Connection Works
The ledger board
The ledger is usually a pressure-treated 2×8 or 2×10 fastened through the siding and into solid framing behind it, such as the rim joist or wall studs. Fastening into siding or sheathing alone won’t hold. Builders typically use structural screws or lag screws sized and spaced to suit the loads, and the exact pattern depends on your local code and the span of the pergola.
Flashing and water
Water is the real enemy here. Metal flashing goes above the ledger and tucks under the siding or weather barrier so rain runs over the connection instead of behind it. Caulk by itself isn’t a dependable seal, because it cracks and shrinks over time. Some builders also use spacers to leave a small gap between the ledger and the wall so water and debris can’t get trapped. Local code may have its own requirements, so follow those.
Matching the method to your wall
Wood-framed walls with siding are the most straightforward, since the framing is easy to find and fasten into. Brick veneer is not structural, so a ledger has to reach the framing behind the brick, which complicates the job. Stucco and concrete block each call for specific anchors and sealing methods. When the wall type is anything other than ordinary siding over wood framing, getting advice from a pro before you buy materials is money well spent.
Permits and Structural Checks
An attached structure is more likely to need a permit than a freestanding one, because it ties into the house. Inspectors may look at footing depth, ledger fasteners, and flashing. They may also ask about snow load and wind uplift, since an attached pergola passes some of its forces into the wall. Your building department can tell you what applies in your area, and a structural engineer can sign off on unusual spans or heavy covers. Skipping this step can cause trouble later, particularly if you sell the house.
Height and Placement
Before settling on the layout, walk the wall and note everything the pergola could collide with.
- Windows and doors, including how far they swing open
- Gutters, downspouts, and the edge of the roof overhang
- Dryer vents, hose bibs, electrical meters, and outdoor outlets
- Air conditioner units and gas meters that need clearance for service
- Second-story windows, if the pergola will sit below them
Aim for a ledger height that clears the door frame with room to spare, and make sure the beam side still leaves comfortable headroom. If the pergola will have a solid or watertight cover, plan a slight slope away from the house so water drains off instead of pooling against the wall. Open-rafter designs don’t need a slope for drainage.
Light, Heat, and Airflow Inside the House
Shade is the main reason for adding a pergola, but it affects the rooms behind it too. On a south-facing wall, a pergola can reduce summer sun through windows and doors, and that lowers the heat building up indoors. The same shade can darken those rooms in winter, when you’d likely welcome the light. Slatted or louvered roofs, and plants that lose their leaves in autumn, give you more flexibility. Think about which rooms face the pergola and how you use them before you commit to a dense cover.
Problems and How to Avoid Them
Water damage behind the ledger is the most serious risk. Proper flashing, solid fasteners, and a clean installation prevent it, and a yearly look at the joint catches early signs of trouble.
A sagging beam usually means the lumber was too light for the span or the posts weren’t set on proper footings. Choose the beam size from a span table or a supplier’s guidance, and don’t stretch it.
Rot at the base of posts comes from sitting in wet soil or on wet concrete. Metal standoff post bases keep the wood slightly above the surface and let it dry out.
Pulling away from the wall happens when fasteners reach only siding or sheathing. Always connect into framing.
Snow buildup matters where winters are heavy, especially with a solid or fabric cover. Design for the expected load or remove the cover during the snowy season.
Attaching to an Existing Deck or Patio
Many people want to tie a pergola into a deck they already have. That’s a different question from attaching to the house wall. A deck is usually designed to carry people and furniture, not the added weight and wind load of a roof structure, so posts bolted to the deck surface or railing can overstress it. The safer approach is to run the pergola posts down through the deck to their own footings, or to have the deck inspected and reinforced by a professional. On a concrete patio, check the slab thickness and use anchors rated for the post loads, or cut out sections for proper footings.
What Affects the Cost
An attached pergola needs fewer posts, but the labor is more careful. Flashing, ledger fasteners, and wall repairs add time. Size, lumber type, footings, permit fees, and any electrical work for lighting or fans make up the rest of the bill. A contractor’s quote will reflect your wall type, and brick or stucco usually costs more than standard siding. Get at least two written quotes that break out the attachment details so you can compare them fairly.
DIY or Hire a Pro
A homeowner with solid carpentry skills can handle an attachment to wood framing and siding, as long as the flashing is done right and the permit is in place. Hiring a pro makes more sense when the wall is brick or stucco, the connection reaches a second story or roofline, electrical work is involved, or you’re unsure about code. A contractor or structural engineer costs less than repairing water damage inside a wall.
The best attached pergolas are the ones you stop thinking about after a year, because the flashing keeps the wall dry, the beam stays level, and the shade does what you built it to do.